Wednesday 1 November 2017

Podi Chutney Powder

Podi Chutney Powder
Podi Chutney powder is almost available in South Indian families,as this powder is the most essential condiment which is required specially on lazy no cooking days.This powder adds a very good flavor to your food,which means if you are not in a mood to cook any sabji or you want a hassle free and tasty meal on your table,then podi powder can satisfy your tongue.
This podi powder is a staple condiment like pickle or chutney,which is made up of powdered lentils.It is also known as dry powdered chutney which is accomplished with dosa,idli and rice too.The taste of this powder is spicy,tangy and sweet as well as salty too.The podi powder is a coarse powder in which the crunchiness of lentils and other spices are found.


Podi powder is little yellow and orange in color as the spices gives a really good color to it.You can add warm ghee in the podi chutney powder and mix it up with hot steaming rice,this will give you a taste of heaven!
I have also used this powder with uttapam also and it adds a crunch in every bite.You can also store this powder in an air tight jar,and it wont get easily spoiled.
A simple method which can ease your life in your home cooked food.So a must try recipe for those people who love simple but rich and yum food.So here goes the recipe after a drooling picture ;-)


Ingredients-


  1. Sesame seeds - 1 tbsp
  2. Oil -2 tsp
  3. Urad  daal - 1/2 a cup
  4. Chana daal - 1/4 cup
  5. Dry red chilies - 17 to 19
  6. Curry leaves - 7 to 8
  7. Asafoetida - 1 pinch
  8. Dry mango powder - 1 tsp
  9. Sugar - 1/2 tsp ( you can use jaggery also)
  10. Turmeric powder - 1/2 tsp
  11. Salt to taste


Method -

  1. Take a pan add sesame seeds and dry roast till it gets golden brown in color.
  2. Put these seeds in a mixer jar and keep it aside.
  3. Now add 1 tsp oil in the pan and heat it up.
  4. Add urad and chana daal in the oil and roast it on low flame till it turns golden brown in color.
  5. Now let it cool down and add this in the same mixer jar which is filled with sesame seeds and keep it aside.
  6. Now add 1 tsp oil again in the pan and heat it up.
  7. Add dry red chilies and roast them till they puff up.
  8. Add curry patta leaves,when you will find the leaves are becoming crisp,then switch off the flame and add this in the same jar.
  9. Let it cool down.
  10. Now add turmeric powder,sugar,salt,asafoetida and dry mango powder and blend it in a form of coarse powder.
  11. Your podi powder chutney is ready to enjoy.

Wednesday 25 October 2017

Cheesy Easy Grilled sandwich

Cheesy Easy Grilled Sandwich
We always feel hungry in evening..Right?
So grab out these easy sandwiches which is made in few minutes.Sandwich is everyone's favorite specially in evening or in morning breakfast.
You can also make these sandwiches in some small get together house parties or kid's birthdays.You can also give these yummy sandwiches in your kid's tiffin too and they are definitely going to love this,as kids do like cheesy eatables in their meals.
You can relish these sandwiches with coffee,tea or any soft drink.


 Sandwiches are found in small street local bakery shops or even high paid  reputed restaurants also.But i believe if you can maintain the same taste by making it at home,then you must try it.
Because home made food specially snacks are the best to opt ,as they are hygienic and freshly made.So why to not make our tempting cheesy sandwiches by our own?
So here goes the recipe of Cheesy Easy Grilled Sandwiches-

  
Ingredients-
  1. Onions-2 medium sized(finely sliced)
  2. Tomatoes -2 medium sized(Finely chopped)
  3. Mozzarella cheese -70 grams (can add more or less as per your choice)
  4. Bread slices-4
  5. Oregano - 1 tsp
  6. Salt as per taste
  7. Black pepper powder - 1/2 tsp
  8. Red chili flakes -1/2 tsp(you can skip this also)


Method-
  1.  Take a bowl and add finely sliced onions.
  2. Now add chopped tomatoes.
  3. Add salt,pepper powder,oregano flakes and red chili flakes.
  4. Now take mozzarella cheese and grate it.
  5. Add it in the bowl too.
  6. Mix all the ingredients very well.
  7. Now take two bread slices at a time and spread butter on it.
  8. Switch on your grilled sandwich maker.
  9. Fill the filing in the bread by adding 2-3 tablespoon of the mixed ingredients.
  10. Now cover the bread with one more bread on the top.
  11. Grill the bread for 15-20 minutes.
  12. Your cheesy-easy sandwiches are ready to enjoy.

Monday 9 October 2017

vegetable Noodles


 Vegetable Noodles

Noodles sounds always yummy for me and my kid too.I think most of us love to have noodles.I have used top noodles which does not have any flavor and taste maker,this means we have to make its flavors by our own.
I have added veggies also to make it healthy.The flavors are very much light in these noodles,this means your kids can also relish it.
These noodles are little sticky but if you are going to follow the recipe,then its really easy and delicious to make.


 We normally buy these noodles from market but you can make this at home by adding few ingredients which are mostly available in your kitchen.
You can give these noodles in your kid's tiffin too,they are definitely going to be happy to see these noodles.I have added little bit of soya sauce and some spices which is enhancing the flavor of these noodles.
So now you can also enjoy your favorite noodles at home only.


 So here goes the recipe of Vegetable noodles- 

Ingredients-
  1.  Half pack of Top Noodles.
  2. 1 medium sized onion(cut in thin slices)
  3. 2 medium sized capsicum(cut in juliennes)
  4.  You can add more veggies like peas,carrots and American boiled corns too.(according to your choice)
  5. 6 to 7 garlic cloves (finely chopped)
  6. Chili Garlic sauce - 1 1/2 tsp(you can reduce the quantity according to your taste) 
  7. Tomato ketchup - 1 tsp
  8. Refined oil-1 tbsp
  9. Soy sauce - 1 tsp 
  10. Black pepper powder - 1/2 tsp
  11. Red chili powder - 1 tsp(you can avoid this)
  12. White vinegar - 1 1/2 tsp
  13. Salt as per taste.

 
Method -
  1. Firstly take the noodles and break them .
  2. Now take a deep pan add water and little salt in it.
  3. Heat the pan and add noodles in it.
  4. Boil the noodles by stirring it continuously because it get sticks very quickly.
  5. Now when you will find the noodles are getting soft ,take them out in a strainer.
  6. Wash the noodles with running water.
  7. Wash it at least 3 to 4 times,so that the stickiness and starch will be removed.
  8. Now after washing the noodles keep the noodles in strainer only and add 1/2 tsp oil in the noodles,to avoid stickiness and your noodles will look more smooth.
  9. Now take a frying pan or wok add 1 tbsp oil.
  10. Now add garlic and onions in it.
  11. Fry them till it turns into pink color.
  12. Now add capsicum and fry it also
  13. Add salt,red chili powder,tomato ketchup,chili garlic sauce and soy sauce in it.
  14. Stir it quickly.
  15. Now add your noodles in the pan.
  16. Mix it gently.
  17. Add vinegar in it and again mix it.
  18. Lastly add some pepper powder and stir it again.
  19. Your Vegetable Noodles are ready to gobble up.

Monday 18 September 2017

Paneer-e-khas

Paneer-e-Khaas
This paneer -e-khaas means its a special dish which is very much loved by my husband ,that's why it is very near to my heart as we Indian women always believe in " A way to a man's heart is through his stomach" :-) 
The main hero of this dish is the texture of the gravy,as its very grainy and creamy and its without cashews but after tasting it no one can say that it is without cashews because its very rich and thick.I haven't used any artificial color for this orange gravy,its purely a natural color of spices and ingredients that i have added in the gravy.
So without any guilt you can enjoy this dish as its healthy and full of taste.


The paneer pieces i have added is grilled in a grill sandwich maker with butter.The grilled paneer will definitely gives you a buttery taste in the gravy.
You can make this Paneer specially on special occasions like parties or get together.It goes very well with hot steaming rice and phulkas too or even pooris also.
This gravy is can be used in making non-veg also,as you can add your fried chicken or roasted one in the gravy that's up to your choice.If you are a hard core paneer lover then you must try this recipe and no one can say that its home made,because it tastes like a restaurant style dish.


Ingredients -
  1. For gravy-
  2. Onions - 3 medium sized(cut in square pieces not too small)
  3. Tomatoes - 4 medium sized(cut in square pieces not too small)
  4. Garlic cloves - 5 to 6(chopped)
  5. Dry red chilies - 2 to 3
  6. Cumin seeds - 1/2 tsp
  7. Bay leaves - 1 leaf
  8. Fresh Malai or cream(2 tbsp)
  9. Milk-1 small cup
  10. Turmeric powder - 1/2 tsp
  11. Salt as per taste
  12. Coriander powder - 1 tsp
  13. Dry mango powder - 1 tsp
  14. Sugar - 2 pinches
  15. Red chili powder-1 tsp
  16. Pepper powder - 1/2 tsp
  17. For grilled paneer-
  18. Paneer - 200 grams
  19. Salted Butter - 1 tsp
  20. Pepper powder for sprinkling on the paneer.


Method -
  1. Firstly take a wok add oil around 1 and 1/2 tbsp 
  2. Heat it up and add cumin seeds,bay leaves and dry red chilies.
  3. Let it crackle
  4. Add onions and fry them till they get little pink in color(do not over fry)
  5. Add tomatoes and garlic and fry them till they get little soft(not mushy)
  6. This process should take only 10 to 12 minutes not more if you want to have a good color.
  7. Add salt,red chili powder,sugar,coriander powder,turmeric powder,dry mango powder and malai and mix it well.
  8. Now switch off the flame and let it cool down.
  9. Take a mixer jar add the onion tomato masala and add milk and give a good whisk to get a smooth paste.
  10. Now in the same wok add little oil again just 1tsp.
  11. Add the gravy in the wok and let it boil properly for at least 10 to 15 minutes again.
  12. You will observe a good color in the gravy.
  13. Now again switch off the flame and let it cool down.
  14. Again take a mixer jar and blend it again.
  15. Now switch on the  flame and add the paste again.
  16. Stir it properly on slow flame.
  17. Now take your paneer slices and put in your grill pan or sandwich maker by adding butter on it.
  18. Grill it till the paneer get a good grilled lines and color on it.
  19. Now check the gravy if its very thick add little water(do not add much water)
  20. Now again boil the gravy after adding water.
  21. Add the pepper powder in the gravy.
  22. Add grilled paneer pieces and sprinkle some more pepper powder on the top of paneer.
  23. Your delicious Paneer-e-Khaas is ready to enjoy.

Tuesday 12 September 2017

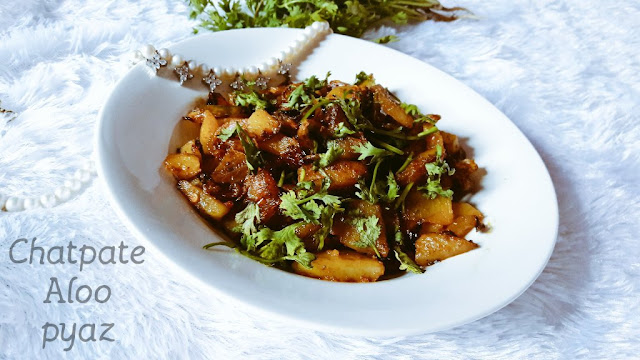
Chatpate Aloo Pyaz

Chatpate Aloo Pyaz
I always believe in "jab ghar me na ho kuch Khaas to bana lo Aloo Pyaz"  ;-) Yes it means when you have nothing special in your kitchen,then you can make Aloo Pyaz.
Potatoes are almost a popular and always available vegetable which is found in our kitchen.Potatoes are normally mixed up in any vegetable as a combo.But sometimes we get bored of eating this vegetable,so to make something interesting as well as quick this chatapate aloo pyaz can help you a lot.With few ingredients you can make this dish and will definitely serve you a complete meal with curd or any daal you like to eat.


 This chatpate aloo pyaz is tangy and spicy too.You can enjoy this sabzi with crispy parantha or puri too.
The deep fried potatoes with crispiness is going to be loved by your family and specially kids,because kids love to eat Aloo.
I have added freshly chopped coriander to give the dish a yummy and fresh fragrance.So why to wait for this jiffy and palatable dish here goes the must try recipe-


 Ingredients-
  1.  5 to 6 medium sized potatoes(wash them,peel them and cut them in medium sliced shape)
  2. 2 medium sized onions(cut in long thin slices)
  3. 2 to 3 Green chilies (i have taken whole chilies with stem)
  4. Oil for deep frying the potatoes.(around 3 tbsp)
  5. Red chili powder - 1 tsp(as per your taste also)
  6. Turmeric powder-2 pinches
  7. Sugar - 2 pinches
  8. Dry mango powder - 1 and 1/2 tsp
  9. Coriander powder - 1/2 tsp
  10. Maggi masala - 1 small sachet
  11. Salt as per your taste
  12. Freshly chopped green coriander around 2 tsp(add more if you like)


Method -
  1. Take a wok add oil and heat it up nicely.
  2. Add potatoes in it and deep fry them,till it changes its color.
  3. Take them out on an absorbent paper.
  4. Now add onions and fry them till they turn golden brown in color not pink means you need to fry them more,if they are pink in color.
  5. Now add potatoes again in the oil.(take some oil out if you are thinking the oil is too much)
  6. Now time to add green chilies,turmeric powder,salt,sugar,dry mango powder,coriander powder and red chili powder,mix it well. 
  7. Now switch off the flame ,now add maggi masala and mix it also.
  8. lastly add some chopped green coriander.
  9. Enjoy your Chatpate Aloo Pyaz with crispy paranthas or puris.

Friday 8 September 2017

Masala Khichri

Masala Khichri
 Khichri sounds boring?
khichri is one of the most nutritious meal which is not liked much by everyone,specially by the kids its not there 'cup of tea'. But this type of khichri,kids would definitely going to love this.This masala khichri is full of flavors and a power pack meal,if you want to skip chapati in your plate,then this khichri will fill your tummy as well as gives you energy also.I have made this khichri with less quantity of rice with large quantity of daal,and this makes the khichri more rich and flavorful.


  The main ingredient  of this khichri is yellow moong daal which is very easy to digest and extremely light.This daal is suitable for ill people ,as they can eat this without any second thought.
Moong daal is normally used in making soups or normal daal.
You can also have this khichri with so many varieties like papad,pickle or sometimes people do take roti also with this khichri.
But i have taken my khichri with loads of home made ghee and lemon pickle which is made up by my dad.
You can make this khichri specially on lazy days,if you are not feeling to cook anything heavy or complicated then you must try out this finger licking khichri.


 So here goes the mouthwatering recipe of Masala Khichri-

Ingredients- 
  1. Moong daal -2 and 1/2 cup
  2. Rice - 1 and 1/2 cup
  3. Oil - 2 tbsp
  4. Onions 2 medium sized (thinly sliced)
  5. Cumin seeds - 2 tsp
  6. Dry red chilies -3 to 4 (optional)
  7. Heeng (asafoetida)-2 and 1/2 pinch(depends sometimes the heeng tastes very strong or sometimes less,so put the quantity as you like to have)
  8. Salt as per taste
  9. Red chili powder-1/2 tsp
  10. Mango Powder (optional)-1 tbsp
  11. Coriander powder - 1 tsp
  12. Turmeric powder - 1/2 tsp
  13. Green chilies 2 to 3(finely chopped)
  14. Loads of ghee to pamper your simple khichri
  15. Freshly chopped green coriander

Method-
  1. Firstly wash the daal and rice properly with running water.
  2. Soak the daal and rice for at least for an hour.(no need to do the separate soaking)
  3. After 1 hour pressure cook the daal and rice together by adding 1 pinch of turmeric powder and sprinkle some salt also.
  4. Add some more water (the daal and rice should be seen as covered by water means 1 rise level)
  5. Go for 3 to 4 whistles.
  6. After 3 to 4 whistles let the cooker cool down completely (be patient)
  7. Open the lid of the cooker and give a good mix to the daal and rice in the cooker.
  8. Now take a deep wok add oil and heat it up.
  9. Add cumin seeds and asafoetida.
  10. Let them crackle.
  11. Add dry red chilies.
  12. Now add onions and fry them till they get little pink in colour.
  13. Now add some more salt,turmeric powder,red chili powder,coriander powder and dry mango powder.Mix it well.
  14. Now time to add daal rice mix.
  15. Add little water and give a good stir.
  16. Mix the onions and daal rice properly.
  17. Now add more water if needed.(depends on the consistency)
  18. Go for a good boil.
  19. Then lastly add loads of desi ghee and sprinkle green coriander on the khichri.
  20. Don't forget to check the salt.
  21. Finally when you are going to serve the masala khichri add more ghee in the center of the khichri.
  22. Enjoy your Masala khichri with the tangy pickle or crunchy papads.

Monday 28 August 2017

Garlic Knots

Garlic Knots
Garlic knots are just like a mini version of garlic bread but its shape is differ from bread.Garlic knots are very crispy from outside and its really simple to make.
The flavor of garlic,butter and the fragrance of fresh coriander was really attractive that you can't stop yourself from eating them.


  Earlier i was very much scared of baking but after many tries,now i am just in love with baking specially savoury dishes. Garlic knots are a good option by having them in your evening snacks and in dinner also with some tomato soup.Dip these yummy garlic knots in your tangy soup and enjoy them.


So why not to start with the ingredients and the recipe!Here it goes for all the foodies who are looking for some party snack or some different evening snack-


 Ingredients -

  1. Dry active yeast - 1/2 tsp
  2. Luke warm water - 1/2 cup
  3. Sugar - 1/2 tsp
For Dough-
  1. All purpose flour - 1 cup
  2. Salt as per taste
  3. Refined oil - 1 tsp
  4. Yellow butter - 1 tsp (cold)
  5. Oregano flakes - 1 tsp
  6. Garlic crushed - 3 to 4 cloves
  7. Freshly chopped coriander leaves
  8. Melted butter for glaze and flavour.

Method -
  1. Firstly take a small bowl add yeast in it,now add warm water and sugar in it and mix it well with a spoon.
  2. Keep it aside for 10 minutes in a warm place.
  3. Now take another bowl add APF in it and add some garlic in the flour.
  4. Then add salt,cold butter and oregano and mix it well.
  5. After that make a well in the center of the flour and add the concoction of yeast in it.
  6. Then add the refined oil also in between.
  7. Now time to use your hands.Knead the dough properly for around 10 minutes and make it in round shape of a ball by tucking the sides.
  8. After that take a bowl grease little oil in it and keep the dough ball in it for at least 2 and 1/2 hour.
  9.  Cover the bowl with a cling film or take a cotton handkerchief make it wet and squeeze it and cover the dough properly  and keep the bowl in a warm place.
  10. After 2 and 1/2 hour take the dough out and knock it by punching it for at least 5 to 7 minutes.
  11. Now take a small bowl add melted butter around 1 tsp and add chopped coriander leaves,mix it well.
  12. Now take the dough and sprinkle some dry Apf and make small balls from the dough by dividing the dough in equal proportion.
  13. Pre - heat the oven at 180 degree for 10 minutes.
  14. Take the small ball and roll it by making a rope shape (do not make it too thin and too thick)
  15. Now take one side and make a knot shape as shown in image.


Now place an aluminum foil on the baking tray and sprinkle some oil on it to avoid sticking or burning from the bottom.
Take the knots and brush them lightly with the butter and coriander mix.
Bake them at 200 degrees for 15 minutes.
After 15 minutes lower the temperature at 180 degree and bake it for more 15 to 20 minutes more.
After 30 to 35 minutes,take out the tray,let it cool down and start plating them.
Your garlic knots are ready to enjoy.

Monday 21 August 2017

Onion Uttapam

Onion Uttapam
 Uttapam is a very famous South Indian dish which is made up of rice flour or semolina also.Its like a pancake crispy from outside and soft from inside.
Uttapam has many varieties like tomato uttapam,capsicum and onion uttapam,cheese uttapam,carrot uttapam and recently i have heard of chocolate uttapam also.Sounds so yummy!
But i have tried a basic recipe of everyone's favorite simple onion uttapam.This onion uttapam is a hassle free recipe which is made up of few ingredients which are always available in our home.

  
  This onion uttapam is a must try recipe specially in your breakfast because its healthy and full of taste.My daughter and hubby is now the biggest fans of this Sunday special breakfast.
This uttapam is quite satisfactory as it will easily fill your tummy.
I have made this uttapam with coconut dhaniya chutney and podi powder,will update these chutneys recipe soon.

 
 So what are you making for your Sunday breakfast?
Go for this crispy Onion Uttapam and I am very much sure your family will also fix up this as a breakfast on every Sunday or any holiday!
Here goes the never failed recipe of Onion Uttapam-


Ingredients-
  1. Idli rice or parmal rice  - 1 1/2 cup
  2. Raw normal rice - 1 cup
  3. Whole Urad daal - 1 cup
  4. Methi seeds (fenugreek) - 1 tsp
  5. Onions - 2 large sized(finely chopped)
  6. Green  chilies - 2 (finely chopped)
  7. Fresh Coriander leaves - 2 tbsp(finely chopped)
  8. Salt as per taste ( i have added around 1/2 tsp)
  9. Oil to give a roast to the uttapams

 Method -
  1. Wash both types of rice and urad daal properly and soak both the rice together in water,but soak urad daal separately.
  2. Soak methi seeds in half cup of water..
  3. Soak it for 4 to 5 hours.
  4. Now take a mixer jar and grind the daal ,rice and methi seeds too in batches to get a smooth paste.
  5. Add required water too.
  6. Keep this batter for rest for at least 7 to 8 hours or whole night to get a good fermented batter.
  7. After 8 hours check your batter,it must have risen up.
  8. Now take a big spoon or ladle and give a stir by adding little water and salt in it.
  9.  The batter should not be very thick neither liquidy.
  10. Now add onions,coriander and green chilies in the batter .
  11. Take a non stick pan add 1 tsp oil and spread the batter on the pan .
  12. Sprinkle more oil on the top to avoid it sticking from the bottom.
  13. When you will find little holes on the top of uttapam then it means its little cooked from the bottom and slow the flame to avoid it from getting burned.
  14. One side of uttapam takes around 7 to 8 minutes to cook up properly.
  15. Now with the help of spatula flip it to the other side.
  16. Press the uttapam with spatuala to get a good crust.
  17. Sprinkle more oil if required.
  18. Your crispy Onion Uttapam is ready to enjoy.


Wednesday 16 August 2017

Chili Corn Chaat

Chili Corn Chaat
Craving for some chatpata snack?Then you must go for this tangy,little spicy and crispy chaat.
This lip-smacking chaat is really a yummy option when you are in a mood to have something healthy and tasty.So this chaat is made up of corns as corns are very nutritious and delicious in taste.
If your kids are feeling hungry specially in evening and they are just forcing you for some different snack,then you must try this chili corn chaat as your kids are going to love it.

 
  Chili Corn Chaat is a good option to make it on some house parties or some family and friends get together.This chaat will definitely give you a satisfaction in your tummy as well as tongue too ;-) The flavors of onions and tanginess of lemon is really tantalizing and no one can deny to have it.So here goes the tempting recipe of Chili Corn Chaat-


Ingredients-
  1. 250 grams - American Boiled Corns
  2. 2 tbsp - Cornflour powder
  3. 1 tbsp - All purpose flour
  4. Oil for deep fry
  5. 2 medium sized onions(thinly sliced)
  6. 1 small sized onion (chopped for garnishing)
  7. Coriander  leaves -(finely chopped for garnishing)
  8. 2 capsicums (thinly sliced)
  9. 4 to 5 garlic cloves(crushed)
  10. 2 green chilies (optional)(finely chopped)
  11. Salt as per taste
  12. 1 tsp  dry mango powder
  13. 1/2 tsp red chili powder(optional)
  14. Black pepper powder as per taste
  15. 1 tbsp tomato ketchup
  16. 1 tsp chili garlic sauce(i have used fun food brand)
  17. Lemon wedges for garnish
Steps-
  1. Firstly take a bowl add boiled corns in it.
  2. Now add cornflour powder,all purpose flour and some salt in the boiled corns.
  3. Mix the powder and corns together.
  4. Coat the corns properly
  5. Take a wok add oil for deep frying the corns.
  6. Heat the oil.
  7. Add the coated corns in the hot oil in batches.
  8. When the corns will start changing its color,it means they are done.
  9. Now put the fried corns on an absorbent paper.
  10. Do the same process with the remaining corns.
  11. Now take again a small wok add 2 tsp oil.
  12. Heat it up.
  13. Add sliced onions and capsicum in it.
  14. Now add salt,green chilies,red chili powder and dry mango powder.
  15. Stir it gently.
  16. After that when the onions and capsicum turns little crispy ,slow down the flame and add tomato ketchup.pepper powder and chili garlic sauce.
  17. Stir it for 2 minutes and switch off the flame.
  18. Take the fried corns and mix them in the wok.
  19. Sprinkle coriander and some raw onions on the corns.
  20. Garnish it with lemon wedges.
  21. Enjoy your Chili Corn Chaat at home.
 

Monday 31 July 2017

Makkhani Chaap

Makkhani Chaap
Soya Chaap is totally a pure vegetarian dish made up of soya bean.Soya is really good for health specially for growing children and aged people.
Its rich in protein which is good for women also.But many people are not fond of eating soya,but this creamy chaap is really delicious and no one is going to deny for this.


This soya chaap is made up of butter and cream,which has given a restaurant style taste to it.You can make this dish specially for parties and get together events at your home.
You can enjoy this Makkhani Chaap with hot steaming rice or fulkas.The thick gravy is the main hero of the dish.So try out the recipe for your loving family and friends.


Ingredients-
  1. Soya chaap - 250 grams
  2. Onions - 3 medium sized
  3. Tomatoes - 4 to 5 big sized
  4. Garlic-10 to 11 cloves
  5. Cumin Seeds - 1 tsp
  6. Bay leaves-1 leaf
  7. Dry Red chilies - 3 to 4
  8. Green chilies-2 to 3
  9. Fresh Malai or cream-2 tbsp
  10. Salted butter - 1 tbsp
  11. Milk - 1 cup
  12. Water - 1 cup
  13. Salt as per taste
  14. Red chili powder as per taste
  15. Black pepper powder - 1/2 tsp
  16. Turmeric powder - 1/2 tsp
  17. Coriander powder - 1 tsp
  18. Garam masala - 2 pinch
  19.  Mango powder - 1 tbsp
  20. Oil for deep frying


Method-
  1. Firstly take out the fozen chaap and put in water till they get soft,take them out and squeeze the excess of water(skip this step  if they are not frozen)
  2. Now cut the soya chaap in small pieces.
  3. Take a wok add oil ,heat it up.
  4. Add the pieces of chap and deep fry them.
  5. When you will find that the color of chap is getting little golden, take them out on an absorbent paper .
  6. Now take another wok add 2 tbsp oil,heat it up and add cumin seeds,red dry chilies and bay leaf in it.
  7. Now take the onions and garlic and make its paste.
  8. Pour that paste in the wok.
  9. Stir the onion paste and add salt,turmeric powder,red chili powder and dry mango powder,mix it well.
  10. When the oil starts leaving the onion masala,take the tomatoes and grind them.
  11. Add tomato paste and green chilies in the wok.
  12. Now stir it well.
  13. Add malai or fresh cream in the wok.
  14. Again stir it properly.
  15. Roast Roast.
  16. Roast till the oil starts leaving the wok.
  17. Now add the pieces of fried chaap in it.
  18. Add dry mango powder,coriander powder,garam masala and stir it well.
  19. Add 1 cup of milk and some water for the gravy and again stir it for 4 to 5 minutes.
  20. Now add butter and black pepper powder in it.
  21. Stir it for few more minutes.
  22. Your Makkhani Chaap is ready to enjoy.

Monday 24 July 2017

Chena Murki

Chena Murki
Craving for sweets?
Try this simple and very nutritious Chena Murki.
Chena Murki is made up of Paneer coated with sugar is a toothsome sweet,which is very easy to make. Paneer is rich in protein and calcium which is very much beneficial for growing kids,but sometimes kids don't want to eat paneer or having milk.So to compensate in their diet plan,you can make this sweet and they are definitely going to love this!


  This sweet is made up of paneer/cottage cheese and it is cooked in sugar syrup with the added aroma of green cardamom and some people add rose water or kesar for a different fragrance.
The softness of paneer pieces inside and coating of dry sugar powder is very delicious.
So why to wait for this yummy recipe!


Ingredients-

  1. Paneer - 250 grams
  2. Sugar-250 grams
  3. Green ilaichi (cardamom)-4 pieces
  4. Rose water-1 tsp


Method-
  1. Firstly take the paneer and cut it in small square pieces.
  2. Now peel the ilaichi and crush it to make the seeds in a powder form.
  3. Now take a pan add sugar and half cup of water in it.
  4. Stir the sugar and water continuously.
  5. Check the sugar that its totally dissolved in water or not.
  6. Now take little sugar syrup in your fingers and make 1 string syrup consistency.
  7. Add paneer cubes in sugar syrup and add ilaichi powder in it.
  8. Stir the paneer cubes continuously.
  9. Now when you will find the consistency of the sugar syrup has turned thick,and you will see bubbles in the pan,then switch off the flame.Keep the pan in a room temperature.
  10. Now add rose water in the pan,stir it continuously.
  11. When you will find that the sugar is turning into dry powder,it means your chena murki is ready.
  12. Now take out your chena murki in a serving bowl and leave the rest of the dry powdered sugar in the pan only.(you can use rest of the sugar in making any dessert or you can put in your tea also)
  13. Your soft Chena Murki is ready to gobble up.Enjoy!

Tuesday 11 July 2017

Khatta Puchka

Khatta Puchka

Puchka known as Gol Gappa , Paani Puri or Water Balls whatever will be the name it always sounds lip-smacking!Khatta Puchka is a famous street chat very much popular and widely available in every place weather a small street or big towns,everyone is crazy about it.
The fried crispy balls stuffed with boiled potatoes,chick peas,chutney and that drooling chilled chatpata water its irresistible.
But I think sometimes its not hygienic to consume golgappas from outside,you never know this,that it can lead to many health disorders also,and specially in rainy season we should avoid it from having it from vendors.So i have tried making each and everything at home only to prevent my family and kids from getting ill.


These puchkas are home made and they have turned out very crispy and tasty.The main hero of the puchka is the water filled in it,as i have used coriander,tamarind,mint and some spices which makes the paani too chatpata and hygienic also.I have also served these golgappas with tamarind chutney which is on my blog,so you can find out the recipe of this chutney known as khajoor Chutney.

So without any tension of getting sick,you can also make this puchkas at home and enjoy it with your family.


So here goes the must try recipe of everyone's favorite Khatta Puchka-

Ingredients -
For Puchka
  1. Maida /APF - 2 tbsp
  2. Fine Semolina - 1 cup
  3. Baking Soda - 1/4 tsp
  4. Oil- 1 tsp
  5. Water for kneading the dough
  6. Oil for deep frying
For Water-
  1. 50 to 75 grams - Fresh green coriander leaves
  2. 25 to 35 grams - Mint leaves
  3. Ginger - 1 small piece
  4. Green chilies - 2 or 3 or (as per your taste buds)
  5. Lemon juice - 2 tsp
  6. Tamarind water (soak the tamarind around half a cup in less than half cup of warm water for 1/2 an hour and then squeeze out its water)
  7. Salt as per taste
  8. Asafoetida - 2 pinch
  9. Rock salt -1/2 tsp
  10. Roasted cumin powder-1/2 tsp
  11. Red chili powder (optional)
  12. Water 2 tbsp
  13. You can add boondi,boiled potatoes and boiled chickpeas as a filling in the puchkas.


Method - 
For puchkas-
  1. Take a bowl add Maida,semolina,oil and baking soda.Mix it well with your hands.
  2. Now take water and knead the dough.
  3. The dough should neither very soft nor very stiff.
  4. Knead the dough till all the ingredients gets mixed up properly.
  5. Now take a muslin cloth and cover the dough with it for 20 to 25 minutes.
  6. After 25 minutes knead the dough again and roll it with a roller pin and make thin puris patiently with gentle touch .
  7. Now take a round cookie cutter or any round cap to give a mini round shape to the puris.
  8. You can reuse the leftover dough again by making a thin round chapati and cut it again with cookie cutter,so that the sides of the dough can be used up properly.
  9.  Now heat the oil in a wok.
  10. Start putting the puris in the oil (put only 1 to 2 puris at a time,otherwise it wont get fluffy)
  11. Fry the puris and flip it gently to get it cooked from other side too.
  12. Take out the puris on an absorbent paper and let it cool down completely.
  13. Your Puchkas are ready.
For Chatapata Pani-
  1. Take all the ingredients mentioned above and put it a mixer grinder by adding 2 tbsp water and and make a smooth paste.
  2. Now transfer the chutney in a bowl and add 2 cups of water.(you can add more water if needed)
  3. Don't forget to taste the water,you can add more spices if needed like salt,cumin powder,asafoetida,chili powder or lemon juice.
  4. Now take the boondi and dip them in hot water,keep it for 5 minutes,squeeze the boondi and put them in your chapata water.
  5. You can add mashed boiled potatoes or boiled chickpeas as a filling in your puchkas.
  6. Your Khatta Puchka is ready to gobble up.Enjoy!

Thursday 6 July 2017

Spanish Leche Frita (Fried Milk)

Spanish Leche Frita(Fried Milk)
Leche Frita is a Spanish sweet typically from Spain.It is made by flour,sugar and milk.This dessert is crispy outside,smooth and mushy inside.Its basically a thick milk pudding and deep fried sweet.Its a delicious traditional sweet which you may not stop yourself once you have started eating it.


This dessert is very much popular in Spanish Restaurants and pastry shops throughout Spain.Its a beautiful light sweetened and healthy dessert which would definitely gives you a sweet satisfaction on your sweet tooth!For this you don't need to go to Spain,as i have tried this toothsome sweet in India which is known as Fried Milk also. 


This dessert is basically for those who loves to have a unique taste on their tongue as its crispy and soft both.The sweetness of milk and the aroma of nutmeg is really doing wonders in this sweet.
You can make this dessert regularly also as a dessert after having dinner.So Why to wait for something delicious Spain dessert at your home only?Here goes the palatable recipe of Spanish Leche Frita Dessert -

Ingredients -
  1. 1/2 cup cornflour
  2. 1/2 cup granulated sugar
  3. 1/4 tsp nutmeg powder
  4. 3 cups milk
  5. 1 tbsp salted butter
  6. 1/4 tsp lemon rind 
  7. 1 egg beaten well
  8. 3/4 cup bread crumbs
  9. 2 tbsp powdered sugar
  10. Vegetable oil for frying


Method-

  1. Take a pan add milk and mix nutmeg powder,butter,cornflour and granulated sugar,mix it up properly.Do not heat it up.
  2. Now switch on the flame and boil the ingredients.
  3. Gradually stir the milk to avoid lumps.
  4. Now when you will find that the milk is getting thick then give a good stir and close the flame.
  5. Add lemon peel in the mixture and again stir.
  6. Now take a baking tin and spread the mix evenly.
  7. Cover the tin with a cling wrap.
  8. Refrigerate it for at least 1 and 1/2 hour.
  9. Now take a bowl beat an egg and whisk it properly.
  10. After 11/2 hour take the tin out.
  11. Cut the milk in to pieces by using wet knife to avoid sticking.
  12. Now spread your bread crumbs in a plate and take 1 piece of milk square.
  13. Dip the piece in egg and coat it with bread crumbs.
  14. Heat oil and deep fry the coated pieces.
  15. Take 1 or maximum 2 pieces at a time.
  16. Fry and flip when it starts turning golden in color.
  17. Take out the fried milk pieces and keep it on absorbent paper.
  18. Now sprinkle some powdered sugar on the top.
  19. Enjoy your Spanish dessert at home.

Chili Garlic pasta

Chili Garlic Pasta Aaj khane me kya hai Mama...kya chahiye Miss Drama :-P ?Pasta...You have enjoyed this advertisement with your kids,and ...